Warning: You are browsing the documentation for PrestaShop 1.7, which is outdated.
You might want to read an updated version of this page for the current version, PrestaShop 9. Read the updated version of this page
How to migrate to PrestaShop 1.7
Manual migration - Process details
We will use the ETL (Extract - Transform - Load) process to complete a migration, a concept usually applied to data warehouses.
The database structure may change with each new release of PrestaShop, but major versions may also imply features being replaced, preventing a shop to be smoothly upgraded in some cases. For these shops, a migration is a solution to be able to keep up with new releases.
We will cover the 3 main steps in this chapter:
- Extract data to be transfered
- Add / modify / delete some values if needed
- Import data on the new shop
Exporting data from the source
In difference with an upgrade, we won’t modify the database directly. We need to export the data first. We use CSV files here, the most compatible and generic format.
Exporting data can be done
- Via the PrestaShop administration panel,
- With your MySQL client.
Depending on the way you export your data, you won’t get the same amount of data in your exports.
Light - Via the administration panel
Exporting data is quite straightforward. On each controller dedicated to the data you want to export, you will find action buttons at the top right of the page:
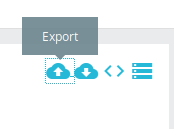
Export button in action bar
For instance for your products on PrestaShop 1.7:
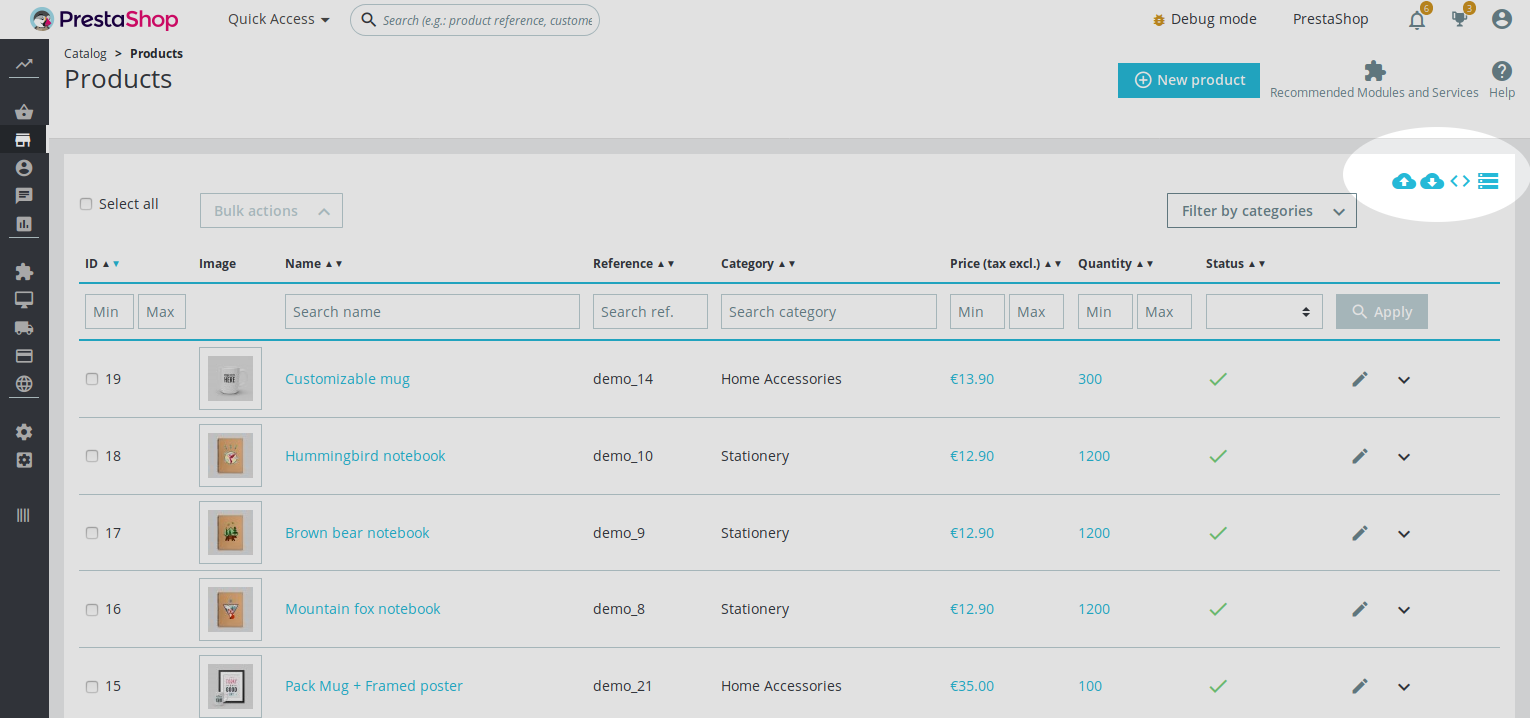
Action bar localization
Clicking on the “Export” button will make your browser download a CSV file, which contains the complete product list with the columns displayed on the page.
With the same process, you can export the following data:
- (Brand) Addresses
- (Customer) Addresses
- (Product) Attributes
- Brands
- Carts
- Categories
- Customers
- (Product) Features
- Orders
- Stocks
- Suppliers
This method is limited to the displayed details (= what you see on the table), thus can be far from being exhaustive. In the case you want more or all columns, you may prefer to proceed manually with your own SQL client.
Complete - Via a MySQL client
Advanced users can use their own client to extract data in CSV. This option give full control on the data to export.
Choosing an extraction in CSV will allow you to bring changes easily with a spreadsheet editor, like Microsoft Excel or LibreOffice Calc.
phpMyAdmin
On phpMyAdmin, exporting in CSV can be done on the same page as the classic SQL dump.
Quick and complete export (recommended)
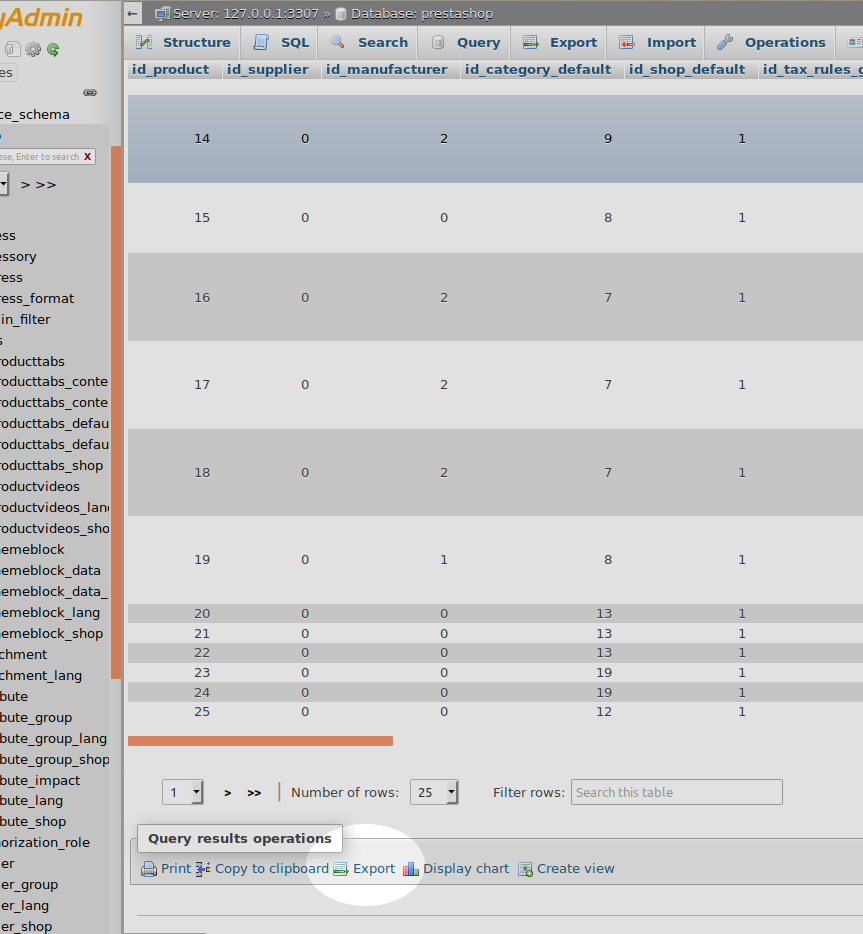
This step can be completed straightforwardly by exporting all tables in a single call. Click on your database, then the “Export” button to start:
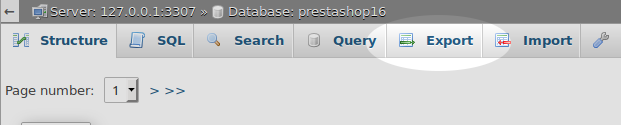
Note the breadcrumb in the header will tell you if you are in a database or a table context. If you clicked on this button by mistake while being on a table, you will end on the export of a specific table as titled on this screenshot:
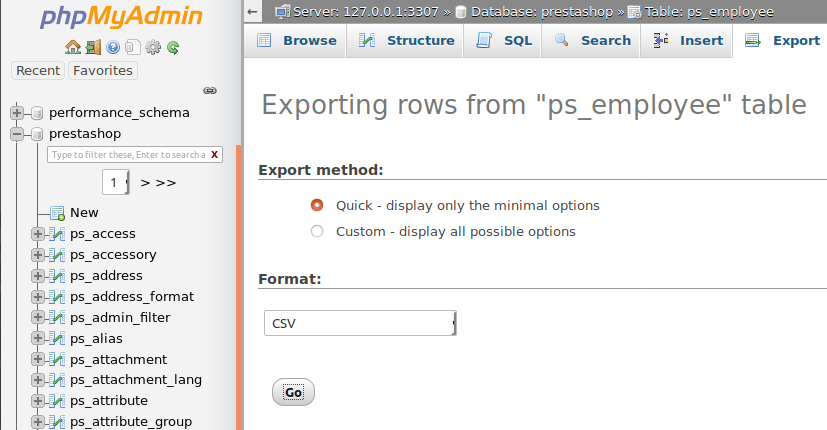
Whatever you choose between exporting the whole database in a single call or exporting your tables one by one, you must choose to export in “CSV” or “CSV for MS Excel”.
The available options will be updated:
If you want to export several tables at the same time, this can be done by selecting them from the list. The tables running with your shop start with the prefix given in your shop configuration (by default ps_). If one of them does not start with this prefix, it is unlikely concerned by the migration and can be ignored.
These tables can be ignored as well:
access: As said, permissions have been reworked and have to be reset. configuration. You new shop already has a new configuration, and overwriting it with the old shop content is a bad idea. currency: Its content will be generated by during another step. lang: Its content will be generated by during another step. module_access: Structure is reworked with the new permission system. As it can’t be migrated easily, we recommend to reconfigure them manually. tab: This table contains the admin controllers accessible on your backoffice. As its values are mainly managed by PrestaShop, do not alter the content of the new shop. tab_lang: Related to tab and already managed by PrestaShop.
To avoid a single CSV file to be returned with all your tables in it, check the option “Export tables as separate files”. You will get a Zip file instead, containing one CSV file for each table.
Finally, we advise to check the option “Put columns names in the first row”. This will be useful in the next step when your data will need to be modified.
Personalized export from custom SQL requests
We explained how to export all your tables to make sure you keep as much data as possible.
If you get your data from another CMS or prefer to proceed with your own method, you can run a custom SQL query to get all the information you need. This option is useful if you plan to import your data with the import feature of PrestaShop.
As an example here is a SQL request to get the main product details, along with the texts corresponding to the first language of the first shop:
SELECT p.*, pl.* FROM `ps_product` p JOIN `ps_product_lang` pl ON p.id_product = pl.id_product AND pl.id_lang = 1 AND pl.id_shop = 1 GROUP BY pl.id_product
If the result fits your needs, you can export it with the “export” button available at the bottom of the page.
mysqldump
If you used mysqldump for your backups, there is also an option for extracting your data in CSV files, as described in the documentation. However, our tests have shown that method is far from being easy.
Example for exporting the table ps_product:
mysqldump -h127.0.0.1 -P3307 -uroot -p -T/var/lib/mysql-files --fields-enclosed-by=\" --fields-terminated-by=\; prestashop16 ps_product
Several notes about mysqldump with CSV files:
- Make sure you set the option
--fields-terminated-bywith the separators you want - The header containing column names is missing from the .txt file and have to be manually inserted
Here is an extract of the product table, with demonstration data. Only the data is present and we need to add the column names.

CSV from mysqldump without header
Look at the SQL file provided with the TXT file, or run a DESCRIBE of the table.
mysql> DESCRIBE prestashop16.ps_product;
You should expect the following result before proceeding to the next table:

CSV from mysqldump with header
- You can rename the generated .txt files with the .csv extension to avoid confusion.
- If you are connected to a remote MySQL server: switching on CSV export will write on the remote filesystem and not on the client one. That’s why writing on a nonexistent or disallowed folder may trigger this error:
mysqldump: Got error: 1290: The MySQL server is running with the --secure-file-priv option so it cannot execute this statement when executing 'SELECT INTO OUTFILE'
If you want to know in which folder you can export the files, run the SQL request:
mysql> SHOW VARIABLES LIKE "secure_file_priv";
Updating the data
Get changes between source and destination databases
Now you have retrieved your data from the production shop, you have to adapt it to the new structure before inserting it on your new database.
An efficient way to get the changes is getting a database structure diff between the 2 running shops. MySQL provides another tool for this called mysqldiff.
Note this utility may be not immediately available on your environment, even if you have the mysql client installed. For instance on Ubuntu, an additional package needs to be installed:
apt install mysql-utilities
This tool can be run anywhere, as long as you can access both servers & databases. The basic use of this command requires the following parameters:
mysqldiff --server1=user:pass@host:port:socket --server2=user:pass@host:port:socket db3:db4
You need to provide the credentials to your MySQL servers. If the source and the destination databases are on the same server, the --server2 parameter can be omitted. db3 and db4 are respectively the source and the destination databases of your data.
Getting the structure diff will require additional options, as provided in this example:
mysqldiff --server1=root:[email protected]:3307 --changes-for=server1 --skip-table-options --force prestashop16:prestashop
- All our databases are on the same server, that’s why only
--server1is provided, - We want to know what are the changes to apply on the 1.6 version to fit the 1.7 structure, so we need
--changes-for=server1 - We only need structure changes.
--skip-table-optionsremoves diff about autoincrement etc. - By default
mysqldiffwill only tell you the databases are not the same and will return immediately. Providing--forcewill make the tool print out details about the differences found.
A example of output is available in https://gist.github.com/Quetzacoalt91/9cef61ebbf12c139f44d27035d3cb1fd. The changes are extracted from a diff structure between a PrestaShop 1.6.1.18 database and another one under PrestaShop 1.7.3.2.
It appears the structure from PrestaShop has not drastically changed from 1.6 versions, although some columns type has evolved. Preparing your data for PrestaShop 1.7 should not need too many changes on your CSV files.
Applying structure change
This step has to be reproduced as many times as you have tables waiting to be migrated. The import step will be easier if you make sure the data you transfer fits the destination structure. This chapter will help to identify the changes to apply depending on the diff created during the previous step.
A few notes:
- Not all differences require a change in your data,
- Basic changes can be done using spreadsheet editor,
- Complex modifications will require manual work.
New column
Any new column added to the database requires the same work on your CSV file. Check on the new shop what default value applies to the new column, by checking in the following order:
- The database schema,
- The ObjectModel (folder classes of PrestaShop),
- The Entity (folder src/PrestaShopBundle/Entity).
Example with the table cart:
--- `prestashop16`.`ps_cart`
+++ `prestashop`.`ps_cart`
@@ -18,6 +18,7 @@
   `allow_seperated_package` tinyint(1) unsigned NOT NULL DEFAULT '0',
   `date_add` datetime NOT NULL,
   `date_upd` datetime NOT NULL,
+  `checkout_session_data` mediumtext,
[...]
Before:

CSV before column addition
After:

CSV with new column
In this example the new column checkout_session_data has no default value and the existing data on our PrestaShop displays an empty column. As the column allows null values, we keep all rows empty.
Column has the same type, but not the same size
Example with address:
- `lastname` varchar(32) NOT NULL,
+ `lastname` varchar(255) NOT NULL,
If a column keeps its type but only increases its size, it does not require any change on your side. The new version offers more room to your text before being truncated.
You will probably notice the same change on your table keys:
- `id_attribute_group` int(10) unsigned NOT NULL,
+ `id_attribute_group` int(11) NOT NULL,
This change does not imply anything on your side. This is a preliminary work for building relations between our tables.
Column removed
This kind of change is easier than adding a column.
- `scenes` tinyint(1) NOT NULL DEFAULT '1',
Open the related CSV, remove the column and save.
However keep in mind in some cases the column may have been moved to another table. If this occurs, you will have to move the content of your column to another CSV.
An example is available for the table
Default value disappeared
- `position` int(10) unsigned NOT NULL DEFAULT '0',
+ `position` int(11) NOT NULL,
Here again, nothing to worry about, as there is no change needed on your data. The default value is now managed by the ORM. However, if the previous version did not show NOT NULL, this could require you to add a default value on the empty rows.
Primary key / unique index updates
If the primary key or one unique key on a table evolves / is added, the import of your existing data can fail if it doesn’t respect the new unicity rules.
-  PRIMARY KEY (`id_feature`,`id_product`),
+  PRIMARY KEY (`id_feature`,`id_product`,`id_feature_value`),
+ UNIQUE KEY `name_UNIQUE` (`name`),
If you see this kind of diff, check that you do not have the same group of values more than once. Is is more likely to happen if a column is removed from a column group, or if a key is added.
Redirection for disabled products
This change is specific to the table product.
- `redirect_type` enum('','404','301','302') NOT NULL DEFAULT '',
- `id_product_redirected` int(10) unsigned NOT NULL DEFAULT '0',
+ `redirect_type` enum('','404','301-product','302-product','301-category','302-category') NOT NULL DEFAULT '',
+ `id_type_redirected` int(10) unsigned NOT NULL DEFAULT '0',
When a product is disabled, the merchant can choose to which other page customers will be redirected to if they try to access it. On PrestaShop 1.7 the number of options has increased, and a redirection to a category page is now possible.
For data coming from PrestaShop 1.6, existing redirections must be updated.
- Column
redirect_type:
| Old value | New value |
|---|---|
| 301 | 301-product |
| 302 | 302-product |
- Column
id_product_redirected: Name is nowid_type_redirected
If you exported your data in CSV, doing this change will be easy with a spreadsheet editor, like Microsoft Excel or LibreOffice Calc. Just make sure to keep the same file extension while saving.
Here is an example before and after the requested update (changes appear in green).
Before (Original state):

After:

Shop details
You will notice that in the shop table the column id_theme has been replaced by theme_name. PrestaShop does not store data about theme in dedicated tables anymore. The only information remaining is the theme name used by each shop.
As migrating to PrestaShop 1.7 implies losing the theme used on the shop in production, just write “classic” in this column for each shop.
Before:

After:

IDs in CSV files
We assume that you will want to overwrite the demonstration data with the data you exported from the old shop. Leaving your IDs intact will replace any existing data with the same ID.
If you want to add the extracted data without overriding the existing records on the new shop, you should take care of removing the IDs from your CSV files, or ignore them during the import.
Preparing the destination shop
Make sure to select dont install demo data when installing the shop
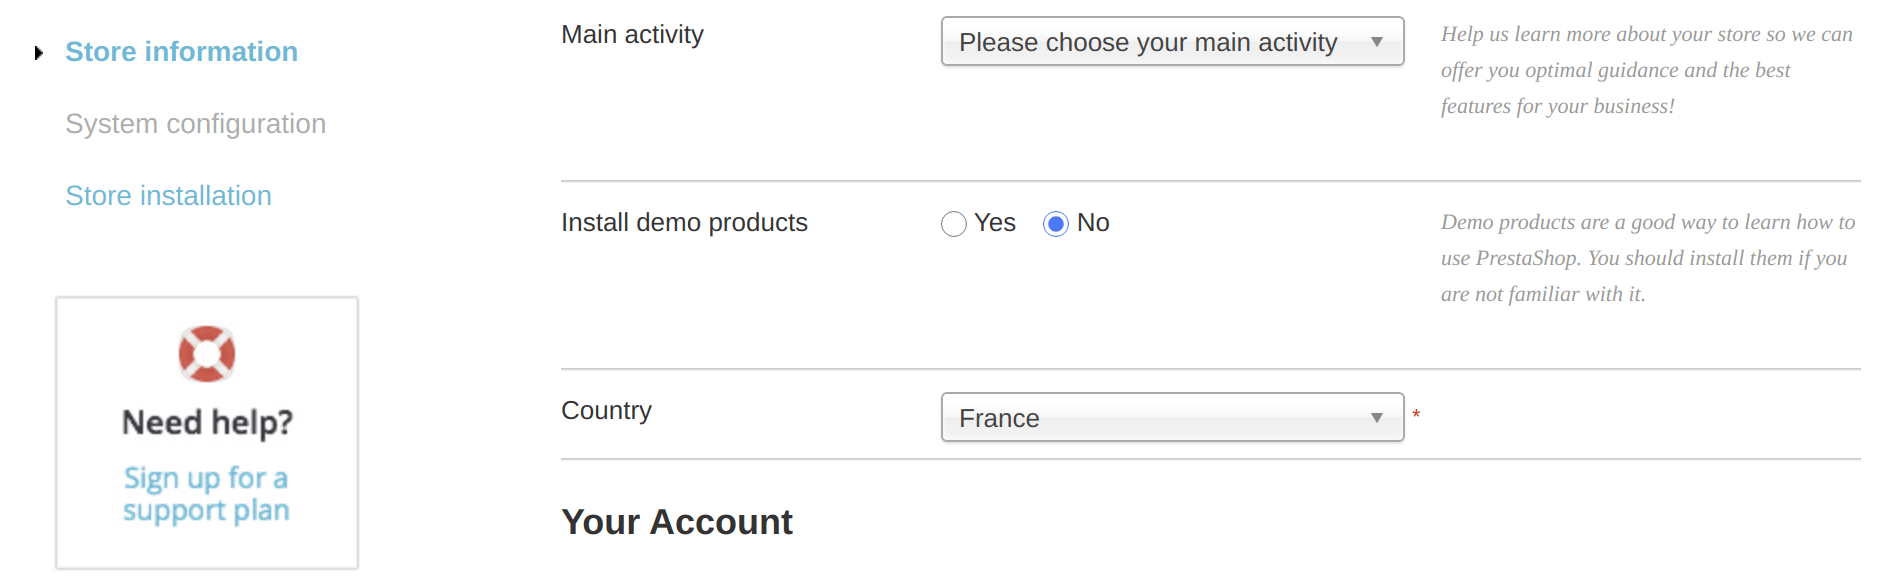
Dont install demo data
Install languages
If you are selling in several countries, additional languages have to be reinstalled on the new shop. This can be done in International > Localization > Import a localization pack.
Also, make sure the IDs of your langs match on the source shop.
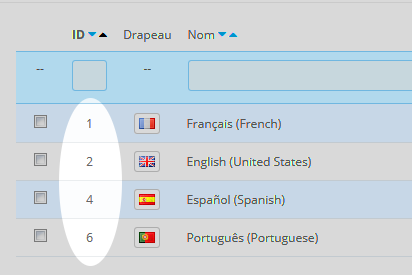
Checking IDs of installed languages on a shop
This is an example of shop waiting to be migrated. As we can see, there is a discontinuity on the languages IDs. To reproduce these gaps, you can add unneeded languages you will remove in a second time.
Importing data
Unlike a restore, we will only import content here, no table structure will be modified. In a migration, the data imported must fit the new structure and not the old one.
Via a MySQL client
PHPMyAdmin
PHPMyAdmin also provides a tool to import the data you previously modified into your tables.
Unlike the export step, we recommend you to proceed with tables one by one.
We assume you want to get rid of the demonstration data of the destination shop, which also makes the import less risky regarding potential duplicate identifiers.
- Emptying demo data
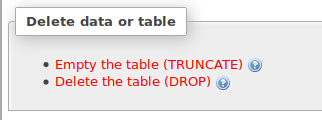
First, clean the table from its content with a TRUNCATE action. As PHPMyAdmin does not allow this step before importing your data, you have to execute it manually. Go to the operations panel of your table.

At the bottom of the page, you will find the critical operations available. As they are destructive for the existing data, they can’t be easily found and are written in red.
If PHPMyAdmin suggests to check the foreign keys, you can disable it. As you won’t import all your tables in a single call, you obviously cannot ensure that your relations will be fine during the process.
- Importing data
Now the table has been cleaned from demonstration content, you can import the data from the old shop. Go to the Import tab from your table.

A form will appear to let you customize your import. The default configuration expects a SQL file to run, so we will have several options to change as shown on the screenshot.
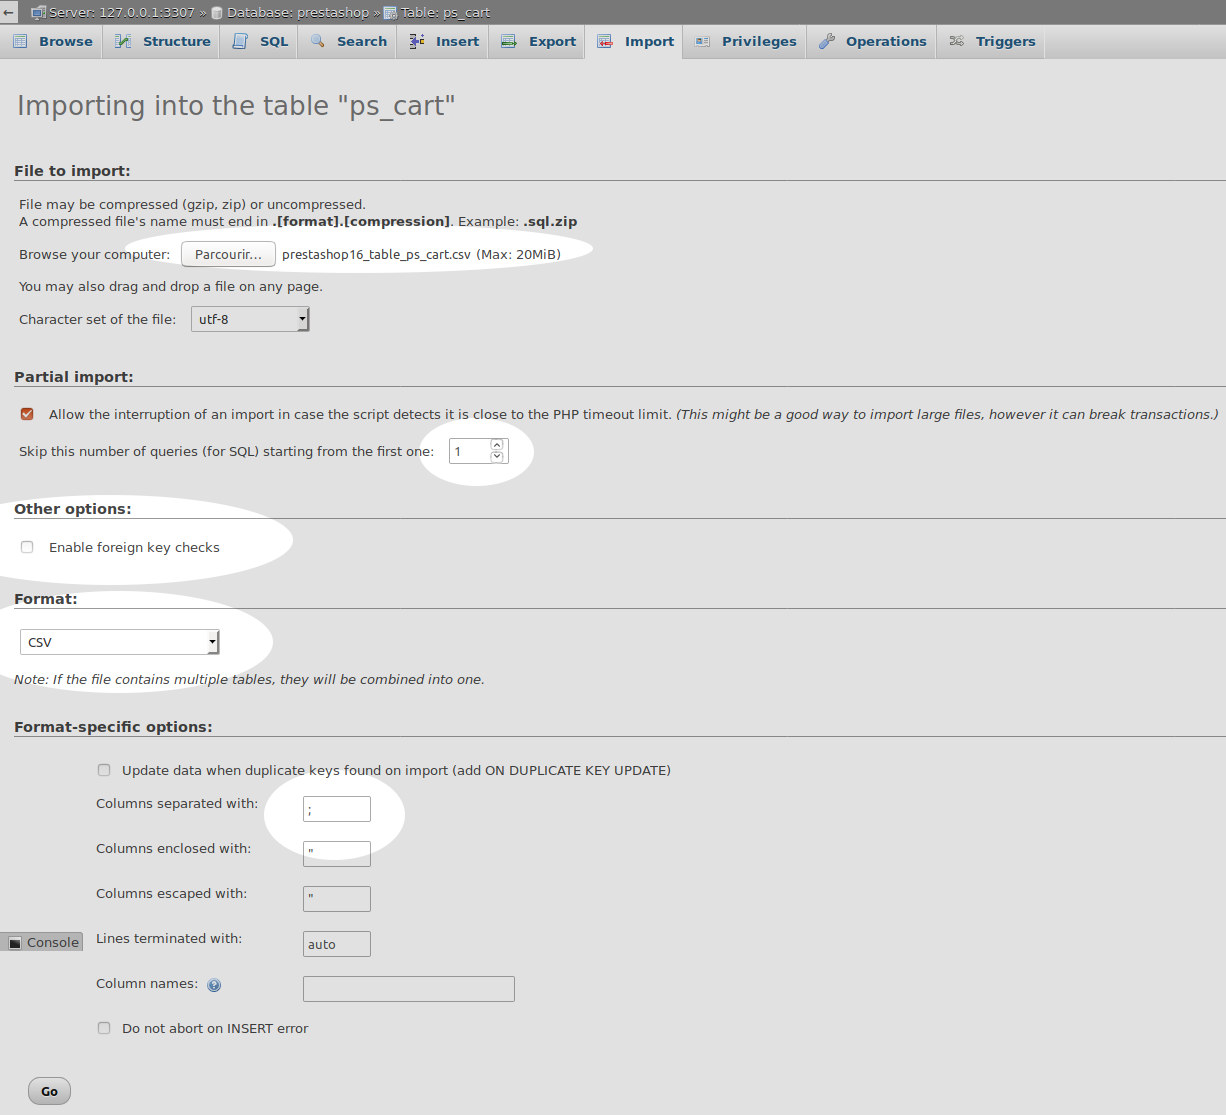
- Start by selecting your CSV file.
- The second option to modify will be the format. Choose “CSV” or “CSV for MS Excel”.
- Skip the first line of your file. We had the column names in the first line to make our file edition easier, but we do not want to import it in the database.
- Disable the foreign key checks. We know some relations don’t exist yet, because they won’t be imported at the same time.
- Double check the CSV settings (separators). A wrong value will make your CSV file unparsable.
Finally, click on “Go”. If everything goes well, you will get a confirmation page like this:
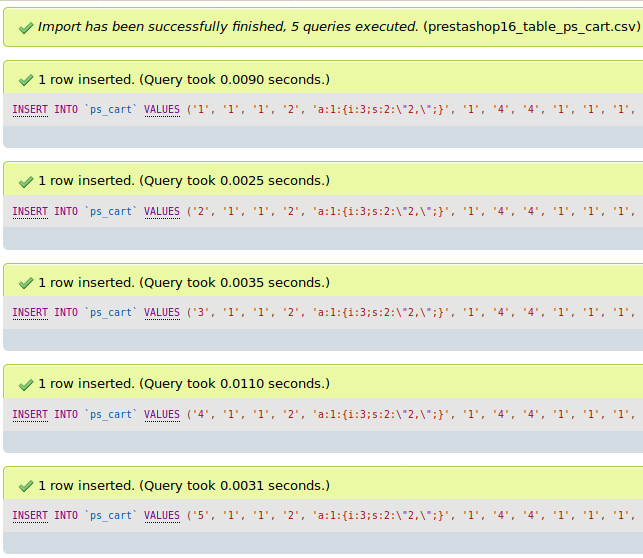
If not, check the error message. An error about the CSV content could be fixed by other import settings, while an SQL error will require you to fix your data.
Repeat the process as many times as you have CSV files.
Via the import feature of PrestaShop
Importing your data can also be done via the PrestaShop administration panel.
That solution is best when your data does not come from another PrestaShop, or if you got your data from customized SQL requests.
It is convenient thanks to its interface and its management of unprovided columns. Unlike imports with a MySQL client, the PrestaShop import feature will always be able to apply the default values for a missing information.
On the new shop, reach the controller Advanced parameters > Import.
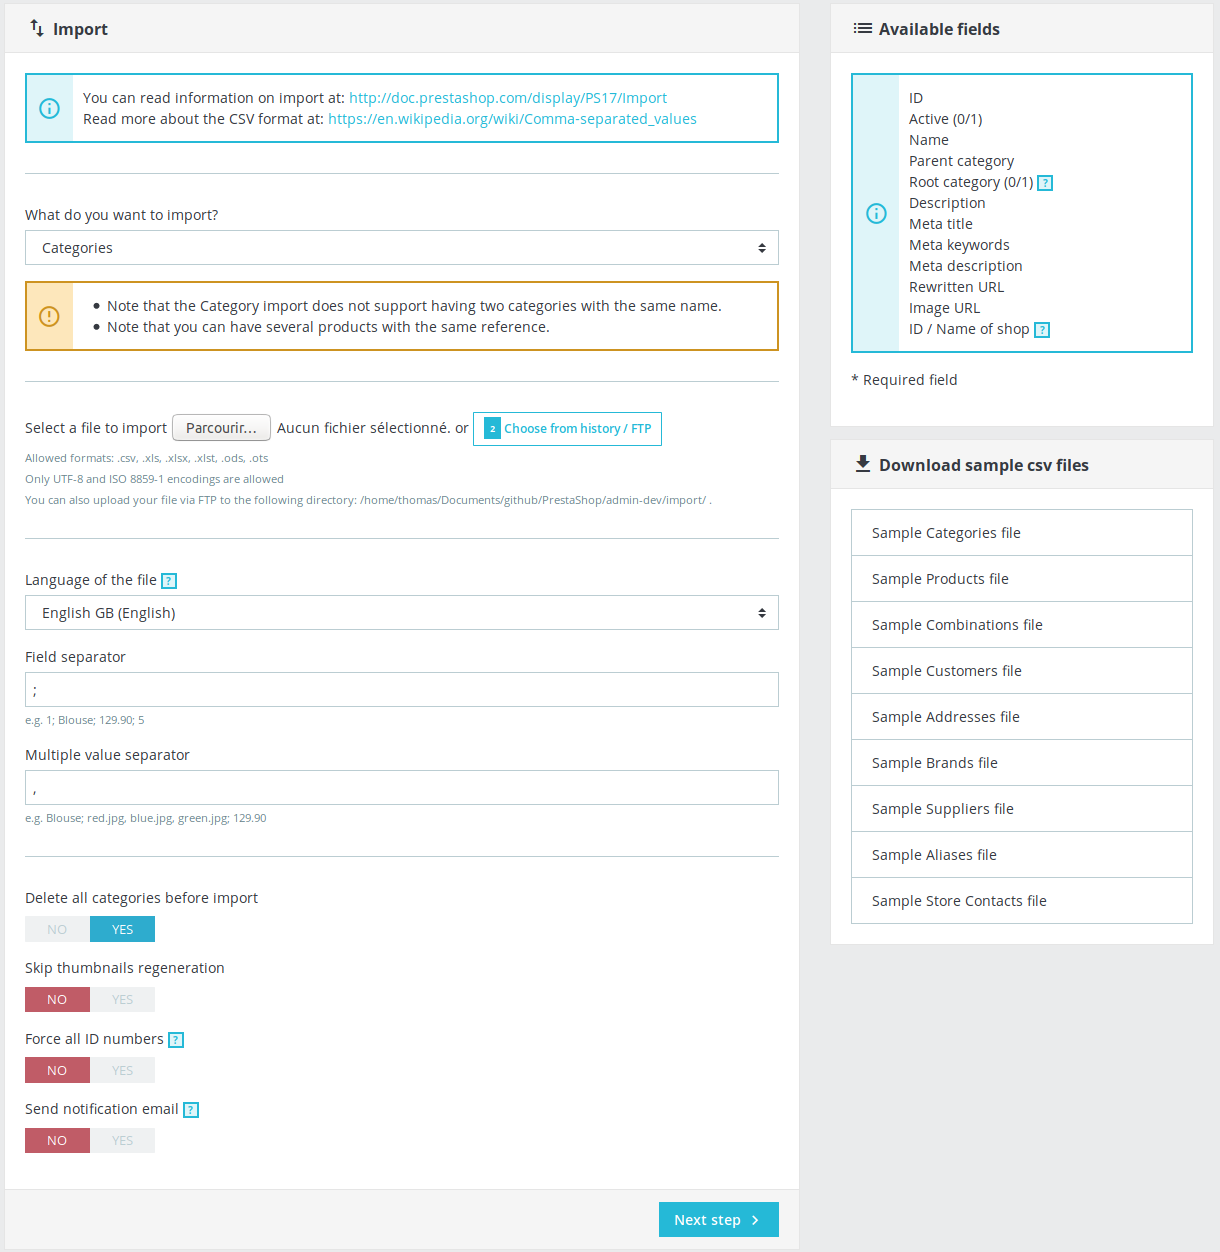
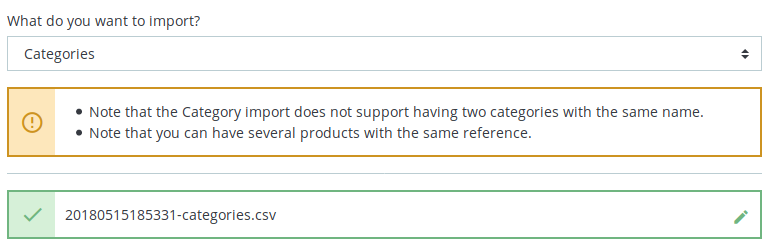
This controller will allow you to import the following data:
- Categories
- Products
- Combinations
- Customers
- Addresses
- Brands
- Suppliers
- Alias
- Store contacts
When possible, try to have only one CSV file per data category ready to be imported. This depends on the file size and the upload size allowed by your server configuration. If uploading a single CSV file is impossible, split it in half and try again.
You have to go through the configuration for each import, which can be tedious in some cases. For instance, if the provided columns do not match the default schema.
Note: Like for the export, each data category must be imported several times if your shop is multi-language – once per language. Forcing the IDs provided by the CSV file will help you link your localized data with the original one.
Import main configuration
To import data, start by uploading your CSV file. It will be done automatically when you select your file from the filesystem.
Before CSV selection or upload:
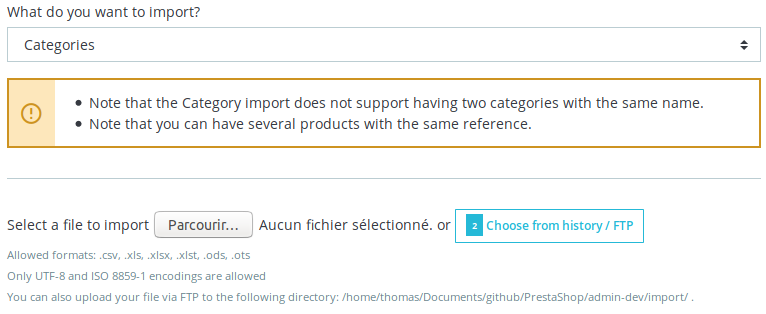
Some warnings may be displayed depending on the type of data to import. They can provide useful advice about forbidden or allowed rules.
Once a CSV is selected:
Double check the field & multiple-value options for your CSV structure. Default values should work in most of case, but incorrect values will make the import fail.
Checking the “Delete all <data> before import” (see screenshot above) option could be useful to clean the demonstration content from your shop before importing your data. But if you export several CSV of the same type of data, make sure to disable it before proceeding with the second and following files.
Column assignment
The second step allows you to link the old columns with the new ones.
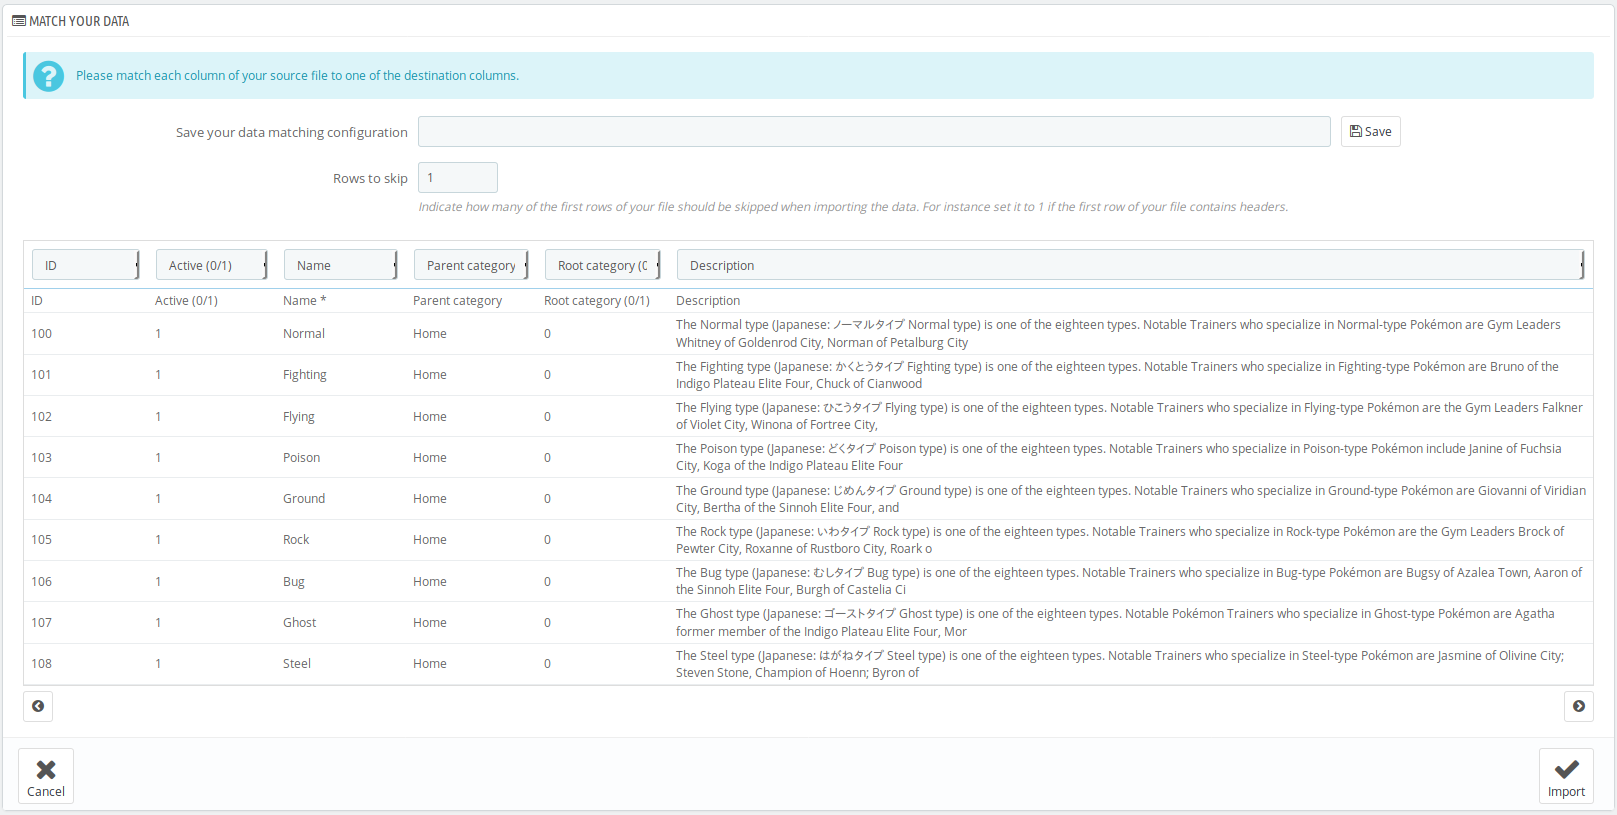
In case a column from the CSV should not be taken in account, you can ask PrestaShop to bypass it by choosing the first option of the list: “Ignore this column”.
When you’re ready to proceed, click on “Import”.
Import progress
From that moment, you can just wait for the process to complete. The time it will take depends on the number of lines to import, and the chosen options.
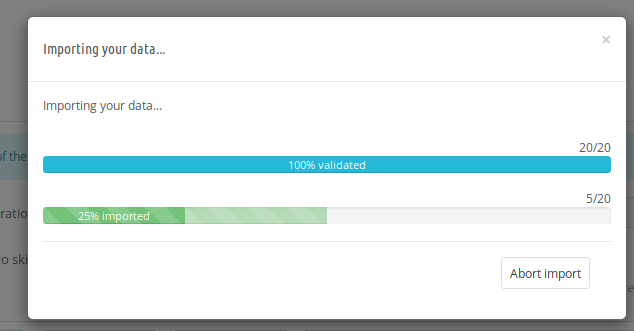
To avoid reaching the maximum execution time of a request, the process will divide your data in several chunks which will be processed in separate HTTP requests.
The import process will start by checking the time needed to process one chunk. Depending on the result, more or less objects will be handled during the next HTTP requests. This gives a nice balance between performance and stability.
Images
Depending on how you migrated your data, (i.e without the import feature of PrestaShop), your images may be missing from the new shop. If they are not present, you may want to retrieve them from the old.
Images are stored on the filesystem and their link to a product is stored in the database. Restoring them depends on how you migrated your data:
- You kept the same IDs when you imported the products
If the IDs are exactly the same between the two shops, copying the folder `/img/p` will be enough to get the images.
Also, you must transfer the data of the tables <PREFIX>images / <PREFIX>images_lang / <PREFIX>images_shop in which the link between your images and products IDs is stored.
- The product IDs have changed in database
The images can be retrieved as well, but this will require some changes.
First, copy the folder `/img/p` to get the images on the new shop filesystem.
Then, you will have to transfer and adapt the data of the tables <PREFIX>images_lang / <PREFIX>images / <PREFIX>images_shop.
The tables <PREFIX>image and <PREFIX>image_shop contain a column which is a reference to product IDs. As they have changed on the new shop, you must update these identifiers in order to match the new values.
This work can be tedious, that’s why we recommend migrating your data on the new shop by removing the existing data at the same time.
- Generate thumbnails
Products images thumbnails must be regenerated in order to be displayed properly on the product page, checkout funnel etc.
Go to Design > Image settings > Regenerate thumbnails to regenerate all the missing sizes.
Attachments
Like the images, these folders need to be copied on the new server:
-
/download (Contains product attachments)
-
/upload (Contains customer uploads)
Like for the images, you will have to adapt some content in your database if you could not keep the original product IDs.
-
<PREFIX>product_attachment
-
<PREFIX>customization
-
<PREFIX>customization_data
Generate search index
Imported products are not immediately available for search to your customers. You must refresh the search index to make them available.
Go to Shop parameters > Search > Indexing and click on “Add missing product to the index”.
Other migration options for developers
The manual process explained how to export and import data with CSV files from database. If you are a developer and you are willing to build your own tools for migrations, other ways exist to get the business data.
The following interfaces will make your tools more efficient and stable than a simple CSV extraction. You can add values stored elsewhere than in the database, handle your own format, and handle many more objects from the source shop.
Object Models
Object Model is an interface in the PHP codebase used by PrestaShop developers to request the database.
This can be used while developing a module responsible of the export and/or import of the objects from/to the database.
For more details, see the page dedicated to ObjectModels
Web service (API)
The webservice API is another way to retrieve or store data in PrestaShop.
It must be enabled from the administration panel before being accessible. See the doc for more details: https://docs.prestashop-project.org/1.7-documentation/user-guide/configuring-shop/advanced-parameters/webservice
Once ready, an API will be available for all the ressources enabled for your key. Basically, the web-service in another interface for object models, themselves interfacing the database.
You can use it to retrieve all your products, categories etc from the first shop, and re-inserting them in the other shop without many changes.
This option is interesting for people looking for making the process automatic, because:
- the webservice has barely changed since PrestaShop 1.5,
- you get all the properties of a given object,
- if a property is multi-lang, you will get the value or a link to another resource for each lang,
- you can get the images URL of a resource (i.e product), while you can’t find directly from a database column,
- getting a resource, or inserting one, is done by manipulating XMLs.
Useful links:
- Learning how-to use the webservice API
- Getting a list of all available ressources, ready for import/export
Migration modules and services
Community module
Although this solution is not made by PrestaShop, it follows the concept of export / import presented here and has been recommended several time on discussion platforms like the forum.
That solution is a module called “MigrationPro” and is available on the Marketplace:
It bundles two different modules to install on your old and new shop, respectively responsible of the export and import of the business data. It uses the object models to interact with the database.
Support service
As well as for the upgrade, you can also ask our support team to proceed with the migration for you.
Your data will be migrated and your compatible modules will be transferred. As the theme will be lost, you get instead a discount on themes available on the Marketplace. This option is useful for merchants who chose to use an existing theme instead of developing theirs.
You can subscribe for this service on the marketplace:
https://addons.prestashop.com/en/support/18689-upgrade-pack-prestashop.html
Many agencies and freelancers propose this kind of service and some of them are certainly in your area.