Warning: You are browsing the documentation for PrestaShop 8, which is outdated.
You might want to read an updated version of this page for the current version, PrestaShop 9. Read the updated version of this page
Using Vue.js
Depending on the PrestaShop version running on the shop, either on the back or the front-office, at least one template renderer is available to display content on the page. With Javascript, it is possible to update & animate the page content without having to refresh the page.
jQuery is available on PrestaShop to help implementing these interface updates. For complex interfaces, with state management for instance, other frontend options could be considered. Vue.js is a JavaScript Framework that will be helpful in this case. This chapter covers its integration on a module.
1- Creation of a Vue.js application in the module directories
The objective of this part is to make Vue.js available in the project.
We will store the Vue.js source code in a dedicated folder that will be present in the module only during the development part. Running Vue.js will be possible by compiling and storing the JS files in the proper assets folder.
During this tutorial, we use a new folder _dev that will be created at the root directory of the module.
Installation of Vue.js can be done via several ways, but we will use the CLI option to get all the stack.
- Installation of Vue.js CLI tool (globally)
$ npm install -g @vue/cli
- Creation of the project
$ vue create _dev
We chose the preset with Vue 2 & Babel for this tutorial.
After the initialization process with some questions and downloads, a whole standalone application
will be created and available in the _dev folder. Running npm commands are defined in the package.json
file to run or build it.
$ cd _dev
$ npm run build
At the moment, we have a Vue.js application that can run independantly from the module. In the next parts, this standalone application will be adapted to run inside a PrestaShop page.
2- Cleanup
Supposing that the Vue.js workspace is the _dev folder:
- Remove the
_dev/public/folder. - In the
_dev/package.jsonfolder, remove theservescript.
3- Customization of the application for a PrestaShop context
In the module structure, JavaScript
files must be stored in views/js/. We will ask the compiler to write the distributable files in there.
Create or edit _dev/vue.config.js with:
const path = require('path');

module.exports = {
  chainWebpack: (config) => {
    // Stop generating the HTML page
    config.plugins.delete('html');
    config.plugins.delete('preload');
    config.plugins.delete('prefetch');

    // Allow resolving images in the subfolder src/assets/
    config.resolve.alias.set('@', path.resolve(__dirname, 'src'));
  },
  css: {
    extract: false,
  },
  runtimeCompiler: true,
  productionSourceMap: false,
  filenameHashing: false,
  // These rules allow the files to be compiled and stored in the proper folder
  outputDir: '../views/',
  assetsDir: '',
  // ⚠️ Change this line with your module name
  publicPath: '../modules/<module_name>/views/',
};
This configuration will delete all files present in the views/js/ folder. Before going further,
make sure:
- there are no existing files that would be lost, or
- to write your generated files in an additional subfolder inside
views/js/by modifyingoutputDir&publicPath.
Then, the scripts available in the package.json can be replaced by these ones:
modules/[module_name]/_dev/package.json
    "build": "vue-cli-service build --no-clean",
    "lint": "vue-cli-service lint --fix",
    "dev": "vue-cli-service build --no-clean --mode development --watch",
The new dev script allow to compile the JS files, and keep watching at any change that would happen
in the project directories. Everytime one file is saved, the compilation will run again immediately.
Testing the compilation of the files is done with:
$ npm run dev
After some time, a similar output should appear on the terminal once done:
$ npm run dev

[...]

 DONE  Compiled successfully in 2679ms                                                                                                                                19:17:27

  File                            Size                                                                 Gzipped

  ../views/js/chunk-vendors.js    121.79 KiB                                                           44.16 KiB
  ../views/js/app.js              5.41 KiB                                                             1.94 KiB

  Images and other types of assets omitted.

 DONE  Build complete. The ../views directory is ready to be deployed.
 INFO  Check out deployment instructions at https://cli.vuejs.org/guide/deployment.html
4- Display of the application
The application is now ready to be integrated inside a page of PrestaShop. There are several steps to complete:
- Adding a div with the proper ID inside a template
modules/[module_name]/views/templates/admin/app.tpl
<link href="{$pathApp|escape:'htmlall':'UTF-8'}" rel=preload as=script>

<div id="app"></div>
<script src="{$chunkVendor|escape:'htmlall':'UTF-8'}"></script>
<script src="{$pathApp|escape:'htmlall':'UTF-8'}"></script>
Although this is not recommended, this example adds the JS file inside the template so the example remains short.
You should use registerJavascript() when possible.
- Displaying the template content
For an application integrated in an AdminModuleController:
public function initContent()
{
  $this->context->smarty->assign([
      'pathApp' => $this->module->getPathUri() . 'views/js/app.js',
      'chunkVendor' => $this->module->getPathUri() . 'views/js/chunk-vendors.js',
  ]);
  $this->content = $this->context->smarty->fetch('module:modulename//views/templates/admin/app.tpl');
  parent::initContent();
}
Or for an application integrated in the module main class (i.e in the method getContent()):
modules/[module_name]/[module_name].php
public function getContent()
{
  $this->context->smarty->assign([
      'pathApp' => $this->getPathUri() . 'views/js/app.js',
      'chunkVendor' => $this->getPathUri() . 'views/js/chunk-vendors.js',
  ]);

  return $this->context->smarty->fetch('module:modulename/views/templates/admin/app.tpl');
}
If the integration goes fine, the page should display the welcome screen of Vue.js:
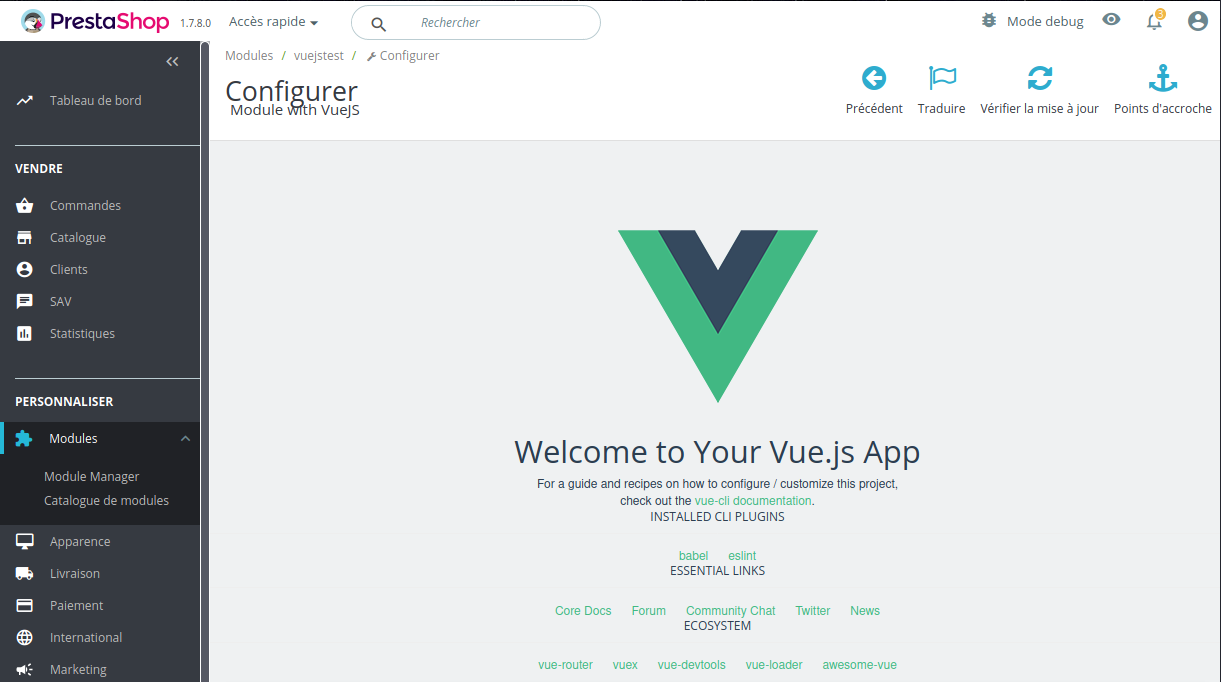
Module configuration page with welcome page of Vue.js
The application is now running and ready to be modified with the module features.
The next steps can be done by relying on the Vue.js documentation or website of any JS dependency that will be added to the project.